Hemming pants is a valuable skill that can save time and money, whether you’re altering a new pair of jeans or giving fresh life to an old set of pants. While it may sound intimidating at first, the process is straightforward and rewarding, especially when you see the tailored look that a hemline provides. Here’s a step-by-step guide on how to hem pants at home with basic tools and little to no sewing experience.
What you’ll need:
- The object you’re hemming
- Measuring tape
- Pins
- Fabric chalk
- Scissors
- And iron
- A sewing machine (or needle and thread it’s sewing by hand)
- Matching thread
Step one:
Start by putting on the pants and shoes you’ll plan to wear with them. Fold the fabric under until you find the desired length. Typically pants should rest slightly above the heel of the shoe. Use straight pins to pin the fabric perpendicular to the stitch line. Then carefully take off the pants without messing up the fold.
Step 2:
Use a measuring tape to measure the length from the fold to the original hem. Then, turn the pants inside out and measure that same distance from the original hem upwards on both legs. Mark this new hemline with chalk or washable marker. Be sure to make consistent marks all the way around the leg to keep the new hem even.
Step 3:
If there is a lot of extra fabric, you can trim it to make the hem less bulky. Leave about one to 1 1/2 inches below your new hemline to allow for folding. This extra fabric becomes the new hem allowance. Be careful when cutting, measure twice and cut once.
Step 4:
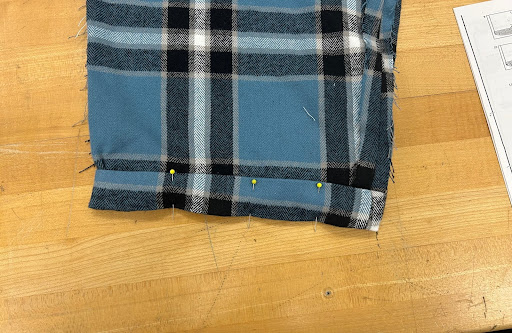
Pull the fabric up to your marked line and press it with an iron to create a crisp crease. Then fold it again so that the raw edge is tucked inside, forming a double fold hem. Second fold to keep it in place. This step is key to a neat and professional look for the finished product.
Step 5:
Use pins or clips to secure the hem. If you’re using a sewing machine, select a straight stitch and sew around the edge of the hem, keeping your stitch as even as possible. If sewing by hand use a blind hem stitch for a clean look. If using a machine be sure to backstitch at the beginning and end to secure the thread if sewing on a machine.
Step 6:
Once the sewing is complete, give the hem one last press with the iron. This will smooth out any wrinkles and set the seam.
Hemming pants may take a bit of practice, but it’s a practical and rewarding skill to know. Whether you’re adjusting dress pants for a job or special occasion, knowing how to hem gives you a little bit more control over your wardrobe.

I am a cross country captain. I have a mini goldendoodle named Captain. I like traveling
Leave a Reply